NFT Image Automation, Say Whaaat??
If you’ve ever wondered how to automate the generation of an SVG image using code to be used as NFT artwork – you’re in the right place. In this blog, I’ll run you through my trials and tribulations whilst trying to achieve this. I’m hoping you’ll learn something, be it my slightly weird personality and choices of metaphors, how SVGs are structured and how to manipulate them, some good learning resources or another way to go about researching/figuring out how to solve a problem.
If you are new to NFTs and need a crash course, read on. But if you know the basics and just want to get to the coding goodness, skip the glossary and head to “What’s the point?“
Crypto and NFT Words To Know
- Cryptocurrency: A digital or virtual form of currency that uses cryptography for secure transactions and operates independently of any central authority.
- Blockchain: A decentralized and transparent ledger technology that records and verifies transactions across multiple computers.
- NFT (Non-Fungible Token): A unique digital asset that represents ownership or proof of authenticity of a specific item, such as artwork, collectibles, or virtual real estate.
- NFT Collection: A curated set of NFTs created by an artist or collector, often with a specific theme or style.
- NFT Marketplace: Online platforms where creators can mint, buy, sell, and trade NFTs, such as OpenSea.
- Smart Contract: Self-executing contracts with the terms of the agreement directly written into code, enabling trustless and automated transactions.
- Ethereum: A popular blockchain platform that supports the creation and execution of smart contracts, commonly used for NFTs and decentralized applications (dApps).
- Wallet: Digital storage for cryptocurrencies and NFTs, allowing users to securely store, send, and receive their assets.
- NFT Generator: Tools or code scripts that automate the creation process of NFTs, including generating metadata and associated art.
- Digital Art: Artworks created and distributed in digital formats, often minted as NFTs to provide provenance and rarity.
- Gas Fee: The transaction fee paid in cryptocurrency to process and validate transactions on the blockchain.
- Binance and Solana: Other blockchain platforms that offer different features and options for NFT creation and trading.
- Creation Process: The step-by-step journey of conceptualizing, designing, minting, and listing an NFT for sale or trade.
- Coding and JavaScript: The programming languages commonly used to develop smart contracts and NFT generators.
- Polygon: A scaling solution and blockchain platform that aims to improve transaction speed and reduce fees for NFT transactions.
On to the goodness…
What’s the point?
Seriously, why bother? Well, my company Thallo has a need. As part of retiring carbon credits on chain, we mint NFTs as a proof of retirement on chain and we chose to generate a piece of artwork to represent the details of the carbon credits and the amount of CO2 avoided or removed from the atmosphere as a result. I won’t go into details such as NFT standards like ERC-721 or ERC-1155 as that is not the point here. What I am going to describe is how we have automated the process of generating the NFT artwork as a PNG image.
Where do we start?
First off, we needed a base image; not just any old base image, but an SVG so that we can manipulate it. Now, I’m not going to say I’m a design expert (or knew a lot about SVGs) so it was a good job we hired a designer to create this SVG for us. But next came the tricky bit, figuring out which bits of XML related to which bits of the generated image…
Learning
Now, different people learn in different ways (this concept was shoved down my throat whilst studying to become a teacher – I didn’t last and decided to become a Software Engineer instead). I learn by doing as opposed to reading all the theory. Don’t get me wrong, you need to do some reading to gain a basic understanding of what you’re trying to do/achieve in the first place otherwise you’ll likely be poking around blind like a bat without echolocation.
So, if you’re a complete noob to SVGs, there is a short video on the Fireship YouTube Channel that gives you a nice overview of some of the basics, you can read this blog, or you can go to the MDN docs.
Basically what I learnt is that I still don’t like XML, but what am I going to do?? I’ve got an SVG which means I don’t have many options, so once I’d learnt the basics, I started hacking apart the SVG. I don’t know about you, but I find XML kind of hard to read, so I simply started commenting out bits of code to figure out which bits related to which images and if the elements I wanted didn’t have an ID, I added one to make my life easier later on.
Slowly but surely, I built an image in my mind (pun intended) of how to alter the image to fit my needs and so I began coding.
Implementation
As I’ve already mentioned, I’m not a huge fan of XML, so I did what anyone that is using NodeJS/TS does and finds a library that will convert it to JSON 😅, the package I stumbled upon was svgson (absolute godsend). This made manipulating the structure far easier than using something like xmldoc. Next up, I had to actually test manipulating the SVG and visualizing the output.
Text Nodes
It is probably always best to start somewhere simple, so what was I going to do? I had a choice from swapping out images, updating some text, adjusting relative positions of elements dynamically, inserting other svgs as child elements, generating a watermark etc. I know what you’re thinking: updating some text sounds painfully difficult, so why not start there? That’s exactly what I did, before remembering I needed a way to find the right element from my JSON structure. Remember those IDs I mentioned earlier? Yup, this is where they come into play. I built a simple recursive function to search the tree for a given element type (‘text’ here) and ID. Yes, recursion has dangers: mainly for me – depending on the depth of the tree and the number of functions the programme needs to keep track of in order to traverse the tree to find the element, but as I knew the structure, I figured this would not be much of an issue.
Once I had read the svg from my local file as a utf-8 string and parsed it using svgson, I could start making changes to the text elements. The JSON structure of a text element looks a bit like this:
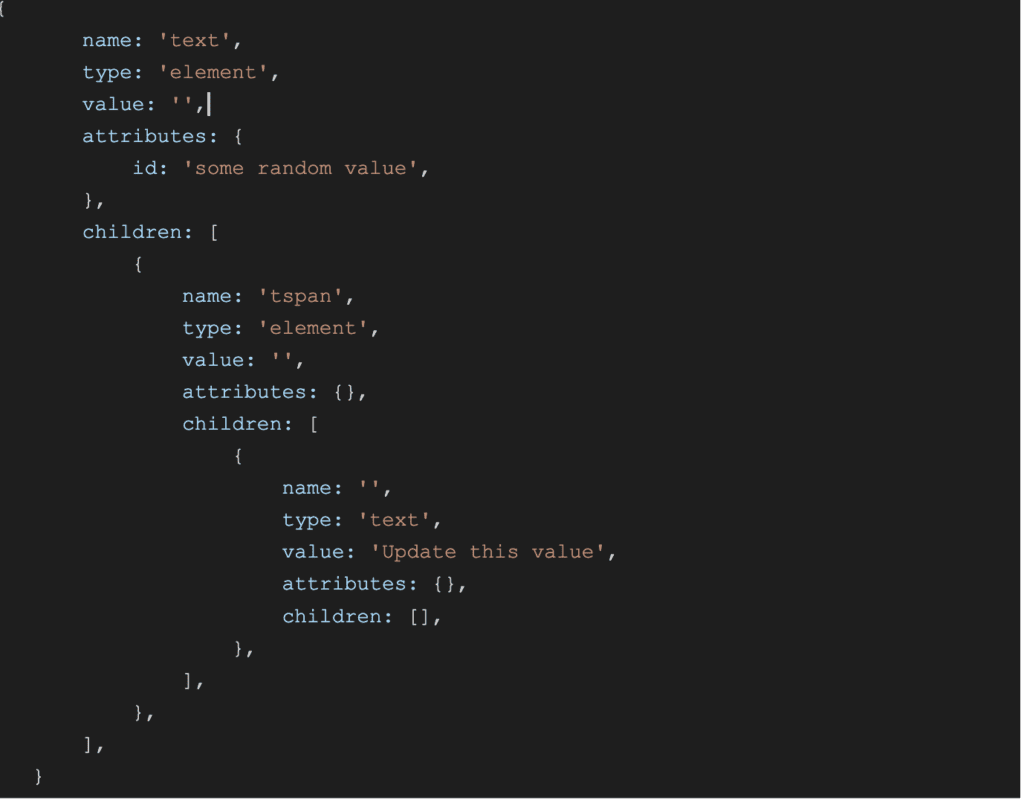
You need to update the value attribute of the text node (the last child element) and hey presto, you’ve made your first change to the SVG.
Now this works for the majority of the text updates, but a problem arises when the length of the string you are updating is not consistent and eventually you end up with elements overlapping each other as text does not wrap in SVG-land; you need to do this yourself. You can either split the string into slices and auto-generate new text nodes for each slice, ellipse the string to a certain length or you can dynamically adjust the position of the element within the SVG itself. We make use of all these approaches for different cases.
Now, it is worth noting that in the case when you add new text nodes wrapped inside a container, the text nodes will not abide by the constraints of the container as their position is absolute and so you will likely have to adjust the x and y attributes of the container to contain the new text nodes. This is fine if the container is a square or rectangle, but if you have curves involved, it becomes a little bit more annoying (especially if you only need to move the x value on one side of the container and not the other).
An example of a curved container is:

What on Earth is that???

You can split that into a few different parts, the bits which actually describe the curves are the ones beginning with C

This describes 3 sets of x, y coordinates which you may need to adjust (have fun with that whilst applying constraints on min and max x or y coordinates). Remember this needs to be dynamic based on the input so needs to be implemented programmatically.
Again, moving one container might mean you need to move another container to accommodate (you can see where this is going so I’m just going to jump off these tracks onto another set now).
Inserting New Images
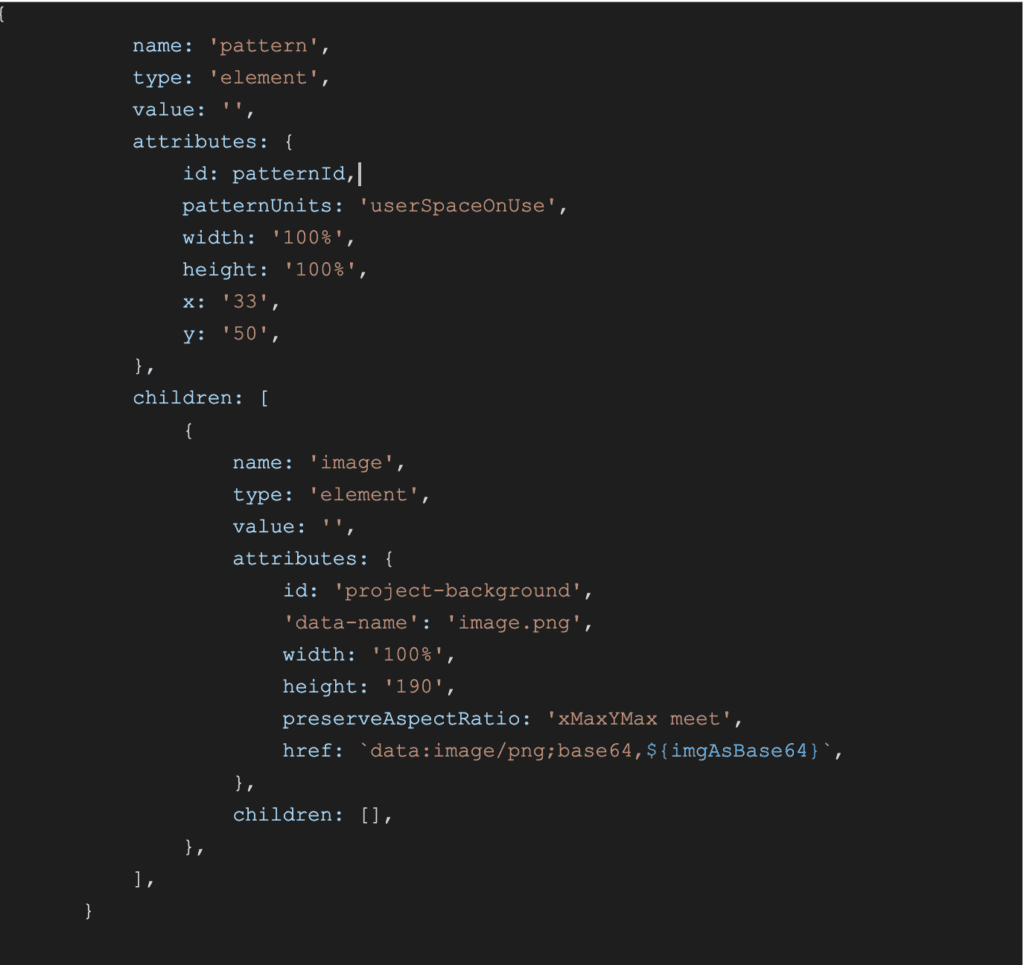
Next thing that I wanted to look at was updating images. Now the original SVG I was working off used a combination of elements to display an image without distortion but did not lend itself readily to dynamic updates. The original approach was to fill a path element with a background image (by way of a pattern element) and masking the portion of the image that did not fit in the container. As all the images we were going to use did not have the same aspect ratio/dimensions, this was not going to work. Yes, I could alter the dimensions of the mask for a given image, but this seemed like a lot of work, figuring out the aspect ratio of the image and thus the size of the mask (in pixels) to cover the rest of the image. However, this seemed overly complicated and meant that some of the images would only display the top half and look a bit weird. The approach I took was to simply crop the images (selecting the best bits) to a consistent aspect ratio, and use the pattern element to fill the path with the background image (without the use of a mask).
This meant 2 things:
- I needed to get rid of the mask from the SVG
- I needed to figure out how to actually take an image from one file and embed it in the SVG itself
To get rid of the mask was pretty straight forward, I just deleted the node from the JSON object after reading and parsing the original SVG. I actually did this with a lot of elements to reduce the overall size of the SVG (I needed to remove other embedded images and superfluous code – the initial file was 6MB and the output file was ~250kB).
To embed a new image in an SVG was actually easier than I thought. All I needed to do was to read the image from file as a base64 string and add a new element like the following as a child of the defs node:
Note: embedding only works with PNG, JPEG and SVG. If you try to use JPG, just treat it like JPEG (they are exactly the same)
Now, all you need to do to use the image as a background is to update the container with the following attribute

Converting to PNG
Now, it is all well and good being able to update an SVG and in all honesty, you could probably utilise the SVG format for whatever your use case is. However, we decided to convert our SVGs to PNGs; mainly because it reduces the file size (not always the case for other SVGs), it is more widely supported (although a lot of browsers etc. do support SVGs) which is important given this is a piece of NFT artwork that is owned by another user and we cannot predetermine how they will display it.
If you want to read more about SVG vs PNG, here is a nice little article.
Anyway, enough about that. What I’m really here to discuss are the options for converting SVGs to PNGs. It is worth noting here that we are running the app inside a docker container and as such do not have access to all the binaries that come with a full install of Ubuntu/Debian/whatever Linux distro you fancy running (this will come into play fairly soon).
Initially, when searching for a solution, I found a lot of online converters (a bit useless for fully automating this process), but there were a handful of npm packages that seemed to fit the bill. Unfortunately, the majority of them seemed unmaintained and so I discounted the verrrryyyy unmaintained ones (last published > 2 years ago). This left me with 2 options: convert-svg-to-png and sharp.
I’ll admit, I didn’t find the sharp package immediately and so began implementing the convert-svg-to-png package. This proved to be a bit of a pain as it used puppeteer behind the scenes to spin up a headless Chromium instance to render the SVG before taking a screenshot. I ran into errors such as the classic No useable sandbox which was fixed by passing the –no-sandbox flag to the puppeteer instance as well as needing to install a bunch of apt packages into my docker image (packages which may have been installed on the host – see, I told you).
Anyway, given how many files we were reading/writing/converting, the response time wasn’t horrendous (~7-8s – it took ~5ms to actually manipulate the SVG once loaded) but this still wasn’t great, especially from a memory/CPU standpoint.
Given I was unhappy, I started my search for an alternative package when I stumbled upon sharp. I suddenly felt lighter than air, I could fly like Aladdin on his magic carpet, it was a whole new World.
The sharp package does not use a headless Chromium instance, instead it makes use of the libvips binary and is generally more magical than Harry Potter. Anyway, testing this out reduced the memory/CPU usage as well as the response time to ~5s, so all in all, a pretty good improvement. Before you complain about something blocking the thread for 5s (as we are using NodeJS), Sharp makes use of async/await so you can keep your wig on.
Results
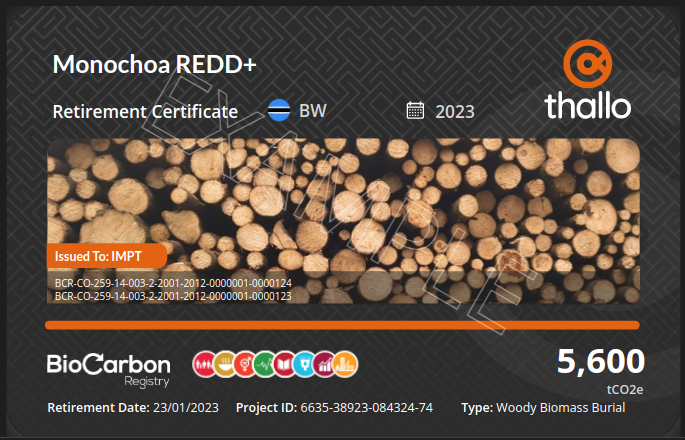
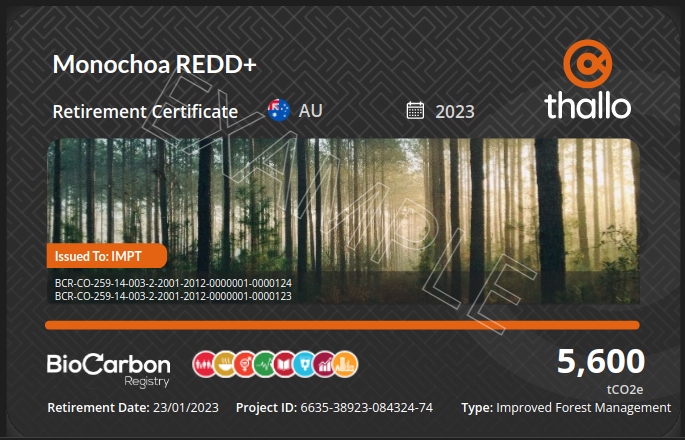
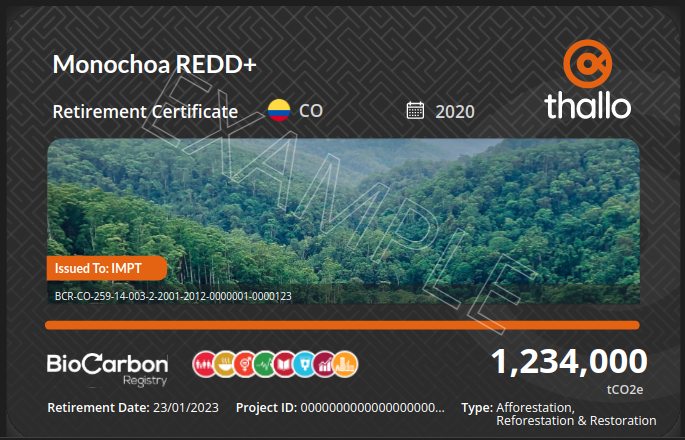
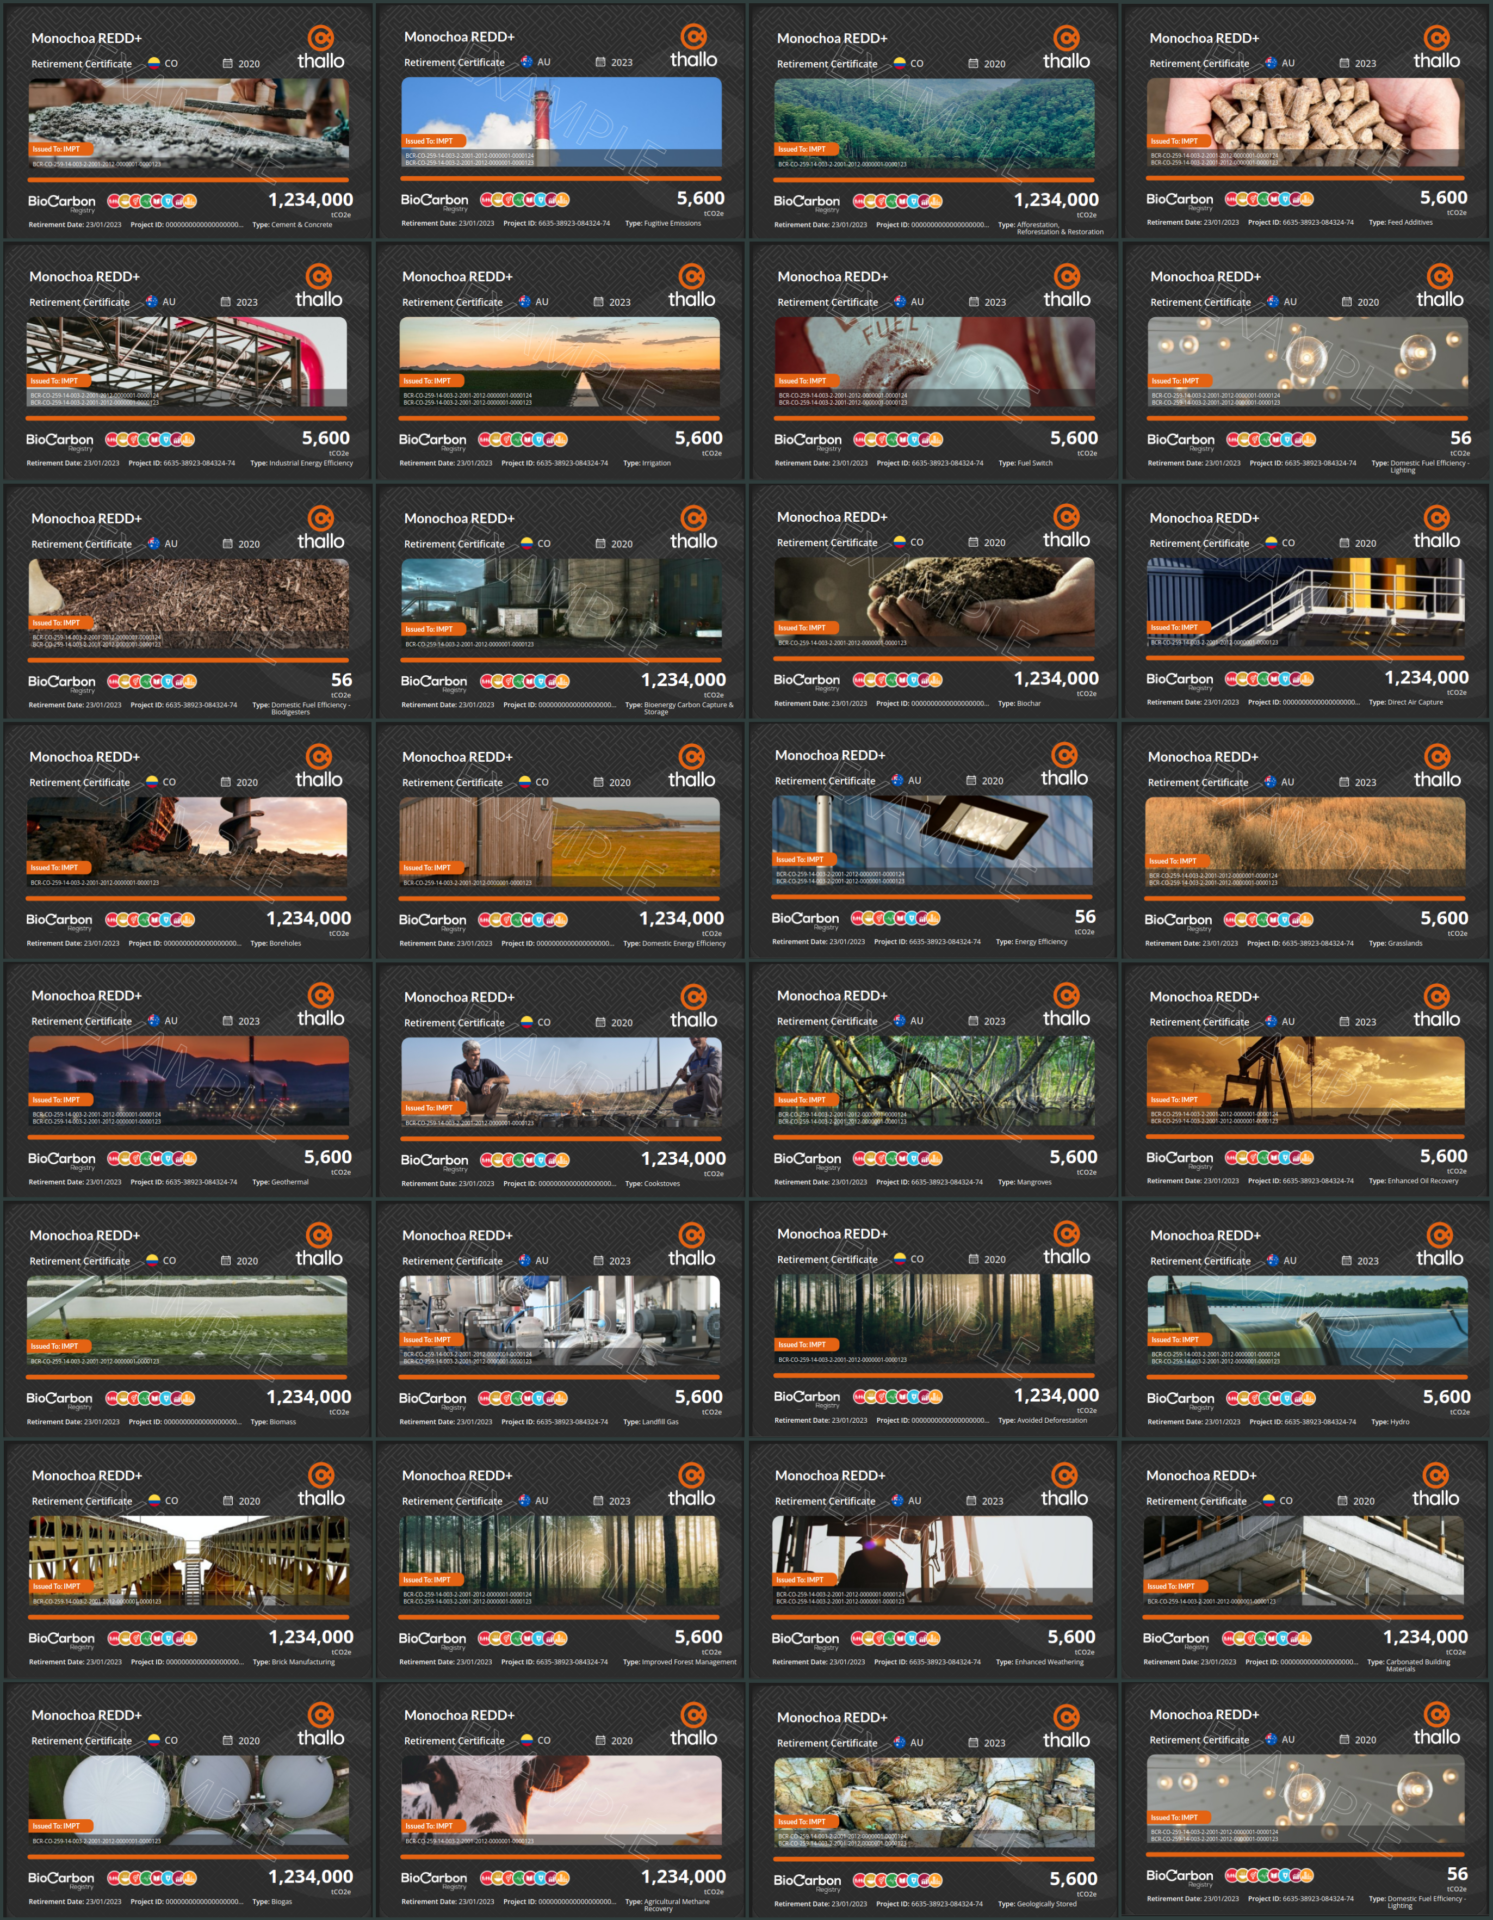
You can see a few of the variations we produce here. The last one employs both ellipses of the project ID when it becomes too long as well as wrapping the text for the project type. You may also notice that we have to shift the position of the number (1,234,000) in the last image. The text element is given some x,y coordinates as the top left position of the element which means that this number would extend beyond the image if left unchecked.
You may also notice some serials like BCR-CO-7854-54783-21. Here, we have to not only add new text elements for every serial, we have to adjust the position of the Issued To: element as well as the translucent container wrapping the serials.
The only things we don’t configure right now are the Thallo logo, the squiggly background image, the text Retirement Certificate and tCO2. Everything else we modify.
Hopefully that was an interesting insight into how and why we have automated the generation of our NFT artwork.